
This whole lead ballast installation is some tricky business. There is no exact recommended weight for our boat because the boat was designed to be home finished with whatever rig and design you choose. 8000 pounds is a good starting point for boats this size, and it may even be enough- there are other Creekmore 45's that were built with 8000 and did just fine. Henry also added 600 pounds bolted on along the bottom in a deeper keel modification that he made. So, our plan is to install 8000 in two compartments. The bulk of the weight will be in the forward compartment, which puts most of the weight amidships as it should be. But then we want a smaller compartment a bit further aft. This aft compartment can be left sort of open topped and will function as a trim compartment which we can add to. The very aft end of the keel will be left open as a deep bilge. Thus, the plan will be to launch the boat with 8600 pounds and adjust from there over time. I'm guessing we'll end up around 10,000 when all is said and done.

It takes Determination to finish a project of this magnitude. In this case, it quite literally takes "Determination", an old weekender runabout that was stripped of all its parts and then slated to be taken to the dump. I had decided against building the containment bulkheads out of wood because I don't want to use something that will rot and leave a giant void where there should be strength. Solid fiberglass walls are the next best choice in my humble opinion. So I cut some panels out of poor old Determination's hull.


Then I sketched the templates onto the side of the hull.

A short while later, with the help of my trusty DeWalt sawzall, the Weekender had given its donation to the cause :)

I took one panel from each side of the boat as it seemed to work out best that way in terms of getting nice flat panels with no molded grooves or anything.


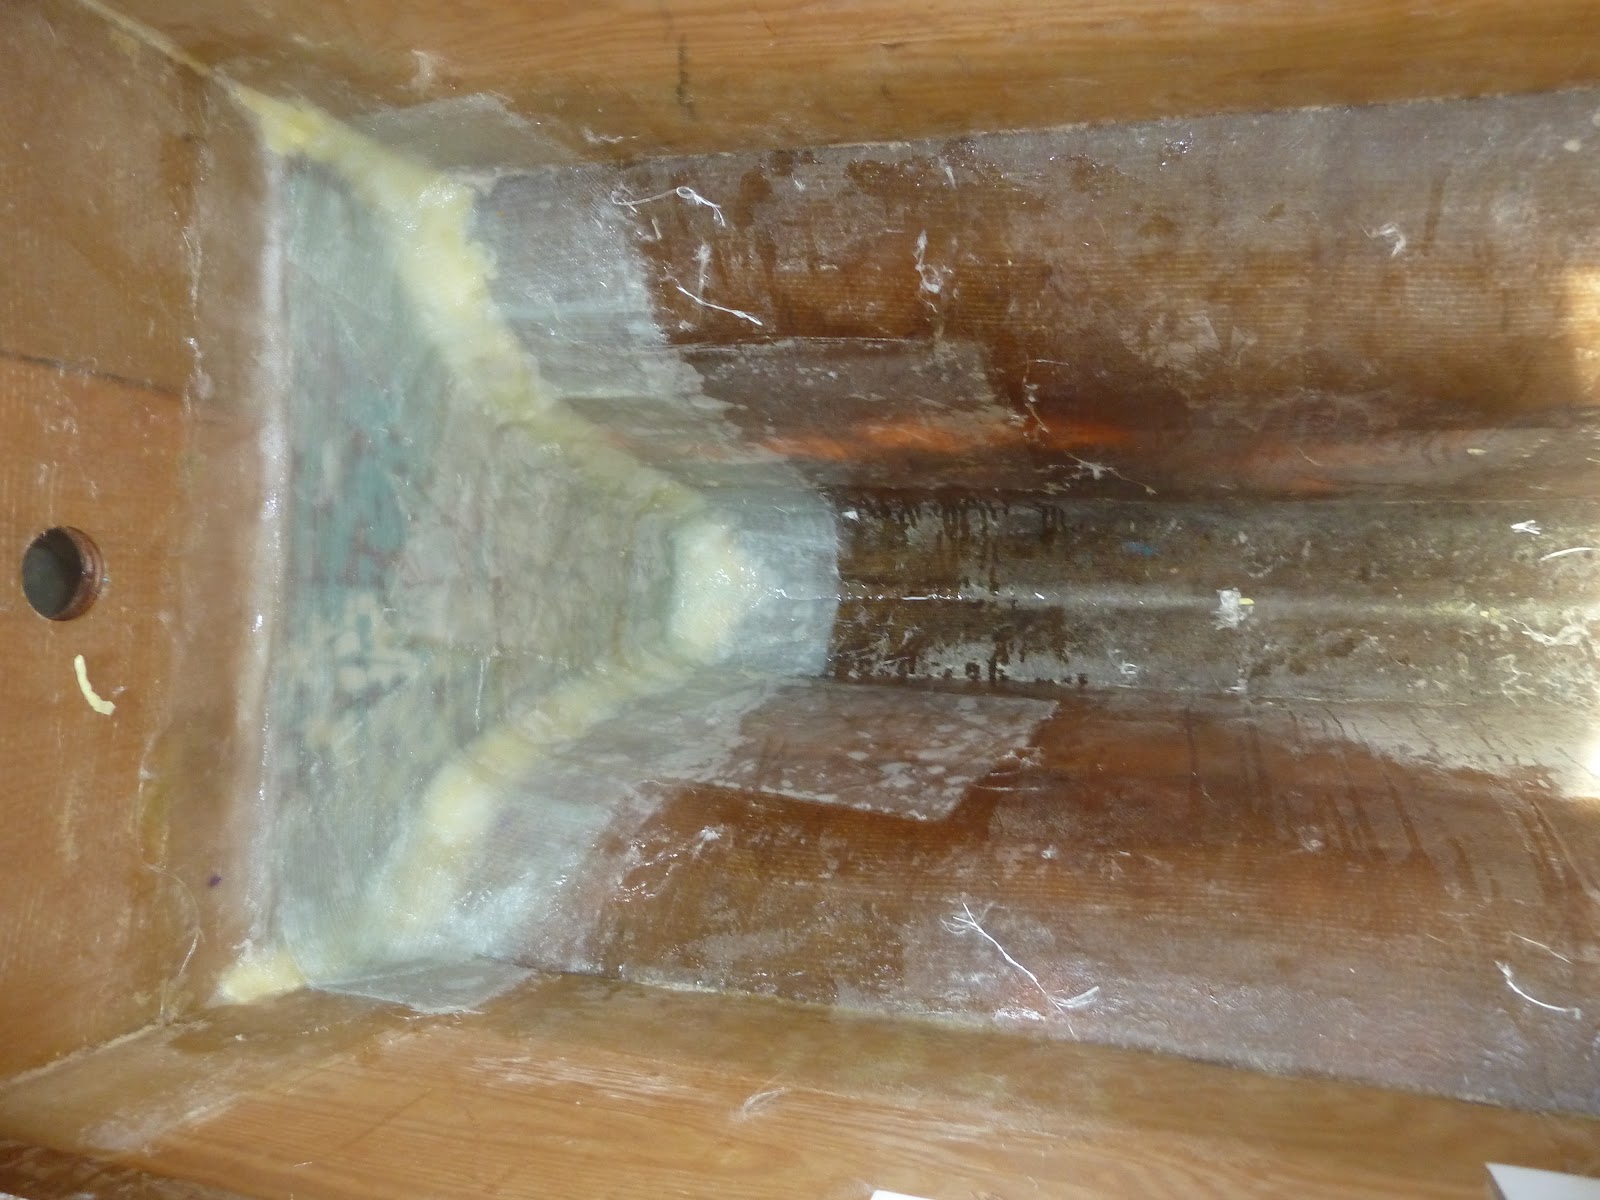
Here I am test fitting the panels in place inside the keel. The forward panel (stage right in the picture) is getting thru-bolted to an existing floor support (I think those are just called "floors" in proper boat terms but I'm not entirely sure). The aft one is screwed in the corners to the mounts for the v-drive. All the bolts and screws are really just overkill as these are about to be fiberglass tabbed in like crazy.

Before I can begin tabbing, I need to create some sort of fillet. A fillet is an soft angle where the bulkhead meets the hull. It provides a softer corner for the glass to take shape in and it spreads the load out so that we don't get stress cracks at the joint. I used spray foam, waterproof window and door sealant. I wracked my brain trying to figure the best sort of closed cell foam and for the cost and workability I just couldn't find anything better. The pic above is the foam sprayed into a line where the aft bulkhead is going to be.

The forward wall in place.

The aft wall in place.

Both walls in place.
What I don't have pictures of right now is the process of grinding the foam back to make a nice concave surface instead of a bulbous foam chunks you see above. What a nightmare that project was. If I ever do a similar project again I will NOT use spray foam. The grinding process made an unholy mess. Our last post titled "Onward" has a picture of me mid-grinding. Everything in the boat was yellow with foam dust and it took FOREVER. Gross.


Sadly, I don't know my fiberglass cloth weights. I have a ton of cloth I picked up on craigslist... just a midweight basic cloth. I used that as a base layer covering both sides of the panels and then using 12-14 inch tabs to attach the whole mess to the inside of the keel. Then, at the Defender warehouse sale I picked up some seriously heavy duty bi-axial cloth with stitched matte. I used this heavy biaxial on top of the cloth, using the matte as the middle layer. I did this on both sides of each panel. So each panel, front to back has "Heavy Biaxial, Matte, Cloth, the panel, Cloth, Matte, and Heavy Biax again".

The finished aft compartment. Soon to be full of lead. The aft bilge is on the very left edge of this picture.
The finished forward bulkhead and part of that compartment. I added two extra giant tabs of cloth just for the heck of it since this wall will be holding so much lead.

Hey Justin, what a labor of love.
ReplyDeleteWhen I was adding some tabs to a boat years ago, my concern was the original bond of the first layer of cloth with the already cured fiberglass. If that bond is not strong, everything else will not help because it is tapered back. Looks like a very nicely done project. Instead of foam, could you have used 5200. Granted it would much more expensive.
I wonder... Instead of using lead filled epoxy, which will it make ticker, would you not prefer to use very thin slow cure epoxy so that all the voids are filled. The marginal additional weight you will get from the lead filled epoxy may not be worth the voids it will leave. The thin epoxy would work it's way around and through the bricks and pellets
I think you are very right about the epoxy, and you hit on part of the plan which I didn't go into detail about. The epoxy I have is from www.raka.com (they get very good reviews and so far it is proving to be good, stable, workable material... at a fraction the cost of West System) and I do indeed have slow cure, thin mix epoxy. I plan to do a lot of injecting with the syringes and making sure it gets down to all the little tiny voids. It will be a bit of an artform to figure out how and when to use the lead shot, when to use the syringe, when to puzzle in blocks etc etc. I think all those things will go together well in the end though.... short of a solid poured keel I think its the best I can do.
ReplyDeleteAWESOME! Great progress and yes Determination! When u see this thru it will have all been worth it. We spent five years restoring our boat and just moved into her. Its a dream come true for us and it looks like you're on your way too. Many begin but few finish... somehow I think you'll be part of the few :)
ReplyDeleteLooking to liveaboard with newborns in the Boston area, how do you get the baby and off the boat safely? do you keep certain items in the car to eliminate luggage? Any special tips for bad weather? Please feel free to send an email to katmegcantwell@aol.com
ReplyDelete